At some point over the summer Michelle - a.k.a I Like Orange, Too, the host for the Bliss circle of do.Good Stitches, put out an entreaty for someone in our circle to step in as quilter for the month of November. For those of you not familiar with how this Flickr group operates, each of the circles in this charity bee has a combination of "quilters" and "stitchers." The quilters are each responsible for choosing the design for the group's quilt 2-3 months during the year, communicating during that month with the rest of their circle, and piecing together the blocks he/she receives, then quilting and binding the piece before sending it to that circle's designated charity. Stitchers, on the other hand, are simply responsible for putting together (generally) 2 blocks each month and sending them off to that month's quilter. I joined the group as a stitcher, knowing my dislike for actually quilting things! However, after several weeks passed and no one else had expressed an ability to step in for November, I decided to challenge myself and commit a little bit more to this group. And that is how I have come to be next month's quilter for the Bliss circle.
I've decided to go with a relatively easy block to piece, leaving size and details flexible, but with specific colors and general style.
I'm looking for the equivalent of two 12" blocks (in the photo above I have one 12" block, one 8" block and two 4" blocks... or, say, four 6" blocks = one 12" block, but no need to be too precise). Please use a solid in any shade of orange, blue or aqua as the background, and prints in the opposite color PLUS black and white prints for the pieced strip going through your block.
Here's a quick little tute on how I did these guys:
I started by selecting a group of background color options, and scraps in blues, oranges and B/W.
Cut your backgrounds into squares or rectangles that are approximately the desired size of your finished block
Selecting from your scraps, start piecing a strip using a single color story mixed with your B/W. Your strip can be anywhere from 1" to about 3" wide, depending on the finished size of the block. Don't worry about being exact as you'll be trimming the edges once you have the strip to the appropriate length.
(I find it easiest to chain piece, so I was working on all 4 strips at the same time, but you can see that each one stays with being EITHER orange OR blue.)
Continue piecing your scrappy strip until it reaches about 1/2" to 1" longer than your background piece. If you are going to piece it in at an angle, make sure you allow for the extra length for that.
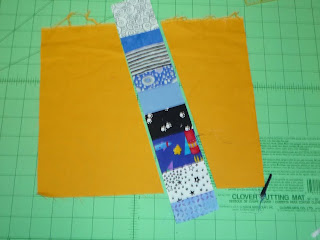
As I was approaching the lengths of my background pieces, I simply held the strips up against them to "measure." Oh, and I don't think I have yet mentioned - please pair the pieced strip with a background of its complimentary color (blue with orange and vice-versa). When you have that complete, press your seams in one direction. Trim up the edges of the strip so they are even.
Next, make a slice through your background, where you plan to add the strip.
Piece them together, press seam allowances toward the background and trim.
And if the finished product ends up a little bit off from the dimensions you were aiming for, no worries. I'm figuring that I'll be putting some filler in to make up for gaps in irregular sizes - I only ask that you trim to square or rectangular, with 90-degree corners, not wonky.
I hope everyone has fun with these guys! If you have any questions at all, or need clarification, just let me know. And thanks to the ladies of the Bliss circle for bearing with me on my first venture as a quilter (in this context!). I look forward to seeing what everyone comes up with!


Looks great! Can't wait to make it, Linda Beth! :)
ReplyDeleteGreat instructions! I'm hoping to get to mine this week! :)
ReplyDeleteLooks good Linda!
ReplyDelete