29 May 2011

Final touches

Okay, so a couple of weeks ago I talked my boyfriend into running errands with me, one of which included picking up several yards of batting from Fabric Depot. That batting still sits folded up on a credenza along side my sewing table, waiting to be cut down to the correct sizes for the finished quilt tops that I actually intend to quilt myself at some point this year.

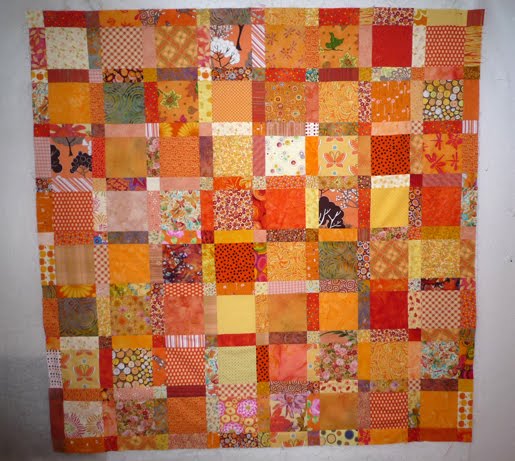
And I just finished one more quilt top to be added to the list:


And that, of course, gives me permission to begin a new one! I have had this sketch in my sketchbook for the last couple of months, and found the ideal fabric to use as the focus, but have been gathering coordinating solid fabrics for the pieced blocks.


Today I began work on it. I started with the easy blocks

and moved on to some of the more complex, though still pretty straightforward


(I still have 4 more of these blocks to make... for some reason my calculations were off. I could have SWORN I only needed 64 pairs, but sometimes getting my head around the numbers is harder than it should be!)

And there is one more type of block to work on, the most involved and least regular of the bunch - leave it to me to save the hardest for last. But here is an intimation of where this puppy is headed:

I hope to get to it either tomorrow or the next day, but I have a couple of diaper bags to work on this week, one of which is intended for a baby shower I unfortunately won't be able to be at next weekend. But love the mom-to-be, and with the help of her sister-in-law found some KILLER fabric to make up her project!! More on that later.

16 May 2011

continuing the place mat process

After spending the better part of an afternoon prepping the raw materials for more place mat sets, I've got about 2 afternoons under my belt at my sewing machine piecing them together (and still one more set to go, plus bindings on all). I do like that Quilt-as-you-Go method, though!

I've decided to upload some process photos, and leave the explanations to a minimum. If you're curious about my QAYG technique, I did a detailed post/tutorial back in February, which you can find here. The sets I am working on currently follow the same basic method, and only differ in combination and placement of fabrics (oh, and in overall number).
(I've already got a larger strip on the "back" side of the batting piece, waiting to be stitched down

pinned in place

front to back

chain stitching a QAYG

the first row on all 8 mats in the set

pressing open

Getting a glimpse of both sides, and see where the joining stitch on one side provides a quilting line on the opposite side. And now my raw edges are lined up, ready to add strips to both sides simultaneously for the next step.


placing a strip face down on each side of the mat, to be stitched down simultaneously.

And so on, and so forth.


Some pics of the *mostly* finished products... bindings yet to come.

color catchers


I finally finished quilting and binding a black, white and red quilt I've been working on as a wedding gift for some friends. The wedding was last summer, and the quilt was begun just around that same time, so (as I do with most of my quilts) I knew it ought to be washed once before gifting.

Though I made a point of prewashing all of the fabrics, also a common practice for me, I was wary about washing those reds and whites together, so I decided to test out the Shout Color Catchers. I have mixed reviews.


I put two sheets in the cold-water wash with the quilt, and as you can see, they certainly had some effect! And for the most part, the whites remained nice, crisp white. HOWEVER, there are a couple of places where red dye DID in fact transfer onto the other patches, especially where the white and red patches touch. I tried to photograph, but I suppose it's a bit too subtle for my little digital point and shoot camera to pick up.

If you look closely (and squint your eyes and form a mental picture) you might be able to see a ghost of red in that triangle with the sunflowers. Bummer. I can only think that the dye transfer would have been much much worse if I had NOT used the color catchers... otherwise I'd have to kick myself for ruining my friends' wedding gift.

15 May 2011

Working with formulas

I'm trying to ramp up my actual production of "stuff," especially after having gone to Portland's Crafty Wonderland fair at the Oregon Convention Center last weekend. It was a great gathering of crafts, and for the most part a good balance of items (though a bit heavy on the jewelry and screen/press printing, but that can't be bad). So, between that excursion and an exchange of emails with my dear friend from BaseNatural (homemade soaps, lip balm, etc.), I've been able to see goals a little more tangibly.

So, I worked out a new formula for more Quilt-as-you-go place mats...


... and started gathering fabrics...


... and cutting strips.


And more strips, for more sets.


And then I cut the batting...


... with the left-overs being the perfect size for future pot holders!

'80s swap - gettin' started

Just a taste of what's to come...

10 May 2011

a new block or two


This past weekend I decided to concentrate on my Flickr bee blocks, as well as a swap project for the next PMQG meeting. I was pleased that in both of the virtual bees that I am participating in, the hostess for the month picked a block pattern that was new to me.

WendyLou {WendyLouP} was the host for this month's "Bliss" circle of do.Good Stitches. She shared a tutorial from Cindy Lammon's blog, Hyacinth Quilt Designs for this block, which Cindy calls Garden Fence


Now, the quilt she features on her blog, which was also apparently featured on Moda's Bakeshop, is stunning, in greys and yellows and white, a beautiful balance. You should definitely check out the link above to her blog post with this. Honestly, it's been a long time since I've been pointed to someone else's tutorial and felt I actually want to make a whole quilt using their pattern, but this one falls into that category!

For the Seams Perfect Bee, it was Rhonda's {adnohrg} month. She went above and beyond, and drafted a block from one she says she saw on a yahoo group. The original quilter used jelly rolls for hers, but Rhonda was trying to stay within our 12.5" block parameters, so she said she plugged it in to her EQ program and got the dimensions needed. Her color requests were to stick with the cooler side of the color wheel - green, blue, aqua and violet.


Now, though Rhonda had gone to some trouble to resize her pattern to get a 12.5" block, I have been making larger blocks for my personal sampler from this bee, so played around with measurements based again on a 2.5" strip. It kind of reminded me of the draping and drafting class I took in undergrad... at least in the sense of "work it out as you go." Let's just say it involved some trimming, but I managed to get a 15" block (half an inch smaller than most of my other blocks so far, but I suppose that's part of the fun of a sampler, right?)

After next month's block I'll take a photo of all of my orange, green, grey blocks together, to date and start to play around with how I will combine them all. Until then...